A Guide to Compliance and Structural Setup for Your Solar PV Roof Mounting System
Categories
Installing Solar PV Roof Mounting System
When installing solar, ensuring compliance with Australian standards and regulations is important for the safety and efficiency of your solar PV system. The mounting system is crucial, providing structural support and stability for your solar panels. Here’s how to verify if your solar PV roof mounting system is compliant in Australia.
Understanding Structural Certification
The first step in ensuring compliance is to obtain a structural certificate from the mounting system supplier. This certificate proves that the mounting system meets the relevant Australian Standards. It specifies the requirements for installation based on the wind region, with stricter standards for higher wind regions (C and D) compared to lower wind regions (A and B). The certificate outlines the number of roof interfaces and screws required for safe installation in each wind region.
Checking for Compliance
Solar electricians accredited with SAA can check the compliance of a solar PV roof mounting system. They should thoroughly examine the structural certificate provided by the supplier to check if it meets all requirements for the specific wind region. Key aspects to check include:
- Location: Consider the geographic location of the installation site and the corresponding wind region to determine the required structural specifications.
- Building Height: Assess the height of the building to ensure the mounting system can withstand the wind loads at that elevation.
- Panel Size: Verify that the mounting system can accommodate the size and weight of the solar panels.
- Roof Zones: Evaluate the different zones on the roof, such as edges and corners, to ensure proper reinforcement and support for the mounting system.
- Panel Mounting Zones: Confirm that the mounting system provides adequate spacing and support for the panels, considering factors like shading and ventilation.
Obtaining Certification Documentation
The simplest way to verify compliance is to request the structural certificate from the supplier or manufacturer. This document should list all relevant Australian Standards and ensure the mounting system meets the installation requirements. If the certificate is not readily available, check on the manufacturer’s website by searching for the product’s model number. Below is an example of the Clenergy Engineering Certificate.

Example Certificates for Popular Brands
Here are some example certificates for popular mounting system brands in Australia:
| Brand | Flush mounting frame certificate | Tiled mounting frame certificate |
| Clenergy | Certificate | Certificate |
| Titan | Certificate | Certificate |
| Antai | Certificate | Certificate |
| SunLock | Certificate | Certificate |
| Mibet Energy | Certificate | – |
| Radiant | Certificate | Certificate |
| Power Wave | Certificate | Certificate |
| Hopergy | Certificate | Certificate |
Additional Resources
You can contact ABI Electric for information about grid-connected PV and battery system installation. We offer expertise and guidance to ensure a smooth and compliant solar installation.
By following these steps and verifying the structural certification of your solar PV roof mounting system, you can have confidence in the safety and reliability of your solar power setup. Compliance with Australian standards is a legal requirement and crucial for ensuring your solar PV system’s long-term performance and durability.
Types of Roof Fixtures for Mounting Solar Panels
When installing a solar PV system, choosing the appropriate roof fixtures is crucial for ensuring stability, durability, and compliance with Australian standards. Different types of roofs require different mounting methods to accommodate factors such as roof pitch, material, and structural integrity. Here are some common types of roof fixtures used for mounting solar panels:
1. Roof Hooks
Roof hooks are versatile fixtures that are attached to the rafters or trusses of the roof. They provide a sturdy anchor point for mounting rails or brackets, allowing for secure attachment of solar panels. Roof hooks are often used on tiled roofs where penetrating the roof material is necessary for proper installation.
2. Flashings
Flashings are waterproof seals installed around roof penetrations, such as roof hooks or bolts, to prevent water ingress and protect the roof structure. They are typically made from durable materials like aluminium or stainless steel and withstand weathering and UV exposure.
3. Rails
Rails are horizontal bars parallel to the roof surface, supporting mounting solar panels. They are attached to roof hooks or other fixtures and allow for adjustable positioning of the panels. Rails come in various lengths and materials, such as aluminium or steel, to accommodate different roof sizes and configurations.
4. Clamps
Clamps secure solar panels to mounting rails without damaging the panel frame. They typically feature adjustable screws or bolts that can that secure and hold the panels in place. Clamps come in different sizes and designs to fit various panel dimensions and rail profiles.
5. Standoffs
Standoffs are vertical supports that elevate the mounting system above the roof surface, providing clearance for airflow and minimising heat buildup. They are often used on pitched roofs to maintain the integrity of the roof structure and prevent damage from prolonged exposure to moisture.
6. Roof Sealant
Roof sealant is applied to roof penetrations, flashings, and joints to create a watertight seal and prevent leaks. It is essential to use high-quality roof sealant compatible with the roof material to ensure long-term durability and weather resistance.
7. Grounding Equipment
Grounding equipment, such as grounding clips and wires, is installed to ensure electrical safety and compliance with local regulations. Properly grounding the solar PV system reduces the risk of electrical hazards and protects against lightning strikes and surges.
Decktite for Solar Panel Roof Mounting
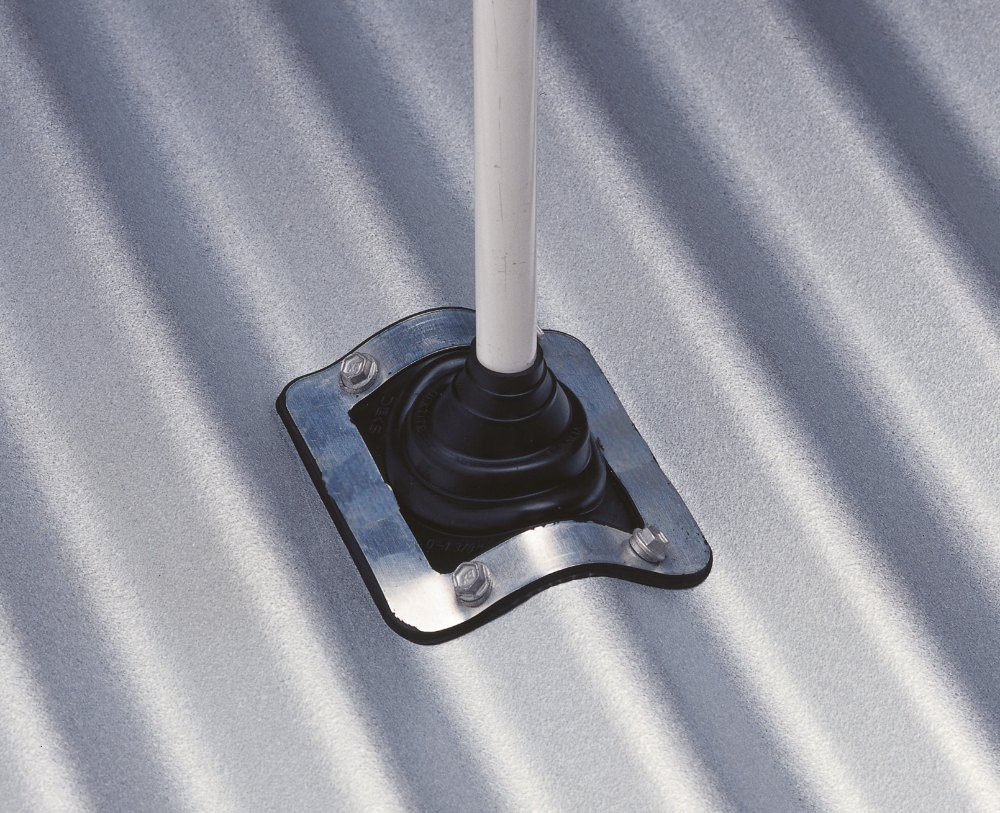
In solar panel installation, Decktite stands out as a versatile and reliable solution for mounting solar panels on various roof types. Decktite is a brand of flashing designed to create a watertight seal around roof penetrations, making it an essential component for securing solar panel mounting hardware to the roof surface.
What is Decktite?
Share:
Decktite is a flexible and durable flashing made from EPDM rubber or silicone, known for its weather resistance and longevity. It withstands exposure to UV rays, temperature fluctuations, and harsh weather conditions, ensuring long-term performance and reliability.
How is Decktite Used in Solar Panel Installation?
Decktite flashing seals roof penetrations created by roof hooks, bolts, or standoffs used in solar panel mounting systems. Decktite prevents water ingress and protects the roof structure from moisture damage by creating a watertight seal around these penetrations.
Features and Benefits of Decktite:
- Flexibility: Decktite flashing is highly flexible, allowing it to conform to the contours of the roof surface and create a tight seal around irregular shapes and angles.
- Durability: Made from high-quality materials like EPDM rubber or silicone, Decktite flashing offers exceptional durability and resistance to weathering, ensuring long-term performance in harsh environmental conditions.
- Ease of Installation: Decktite flashing is easy to install, requiring simple cutting and shaping to fit around roof penetrations. It can be secured using screws or adhesive, providing a hassle-free mounting solution for solar panels.
- Versatility: Decktite flashing is suitable for use on various roof types, including metal, tile, and corrugated roofs. It can accommodate different mounting hardware and configurations, making it a versatile choice for solar panel installations.
Considerations for Decktite Installation:
- Compatibility: Ensure that Decktite flashing is compatible with the specific mounting hardware and roof type used in your solar panel installation.
- Proper Installation: Follow manufacturer guidelines and best practices for installing Decktite flashing to ensure a secure and watertight seal around roof penetrations.
- Maintenance: Periodically inspect Decktite flashing for signs of wear or damage and replace it if necessary to maintain the integrity of the roof seal.
Choosing the Right Fixtures for Your Roof
When selecting roof fixtures for mounting solar panels, it’s essential to consider factors such as roof type, pitch, material, and local climate conditions. Consulting with a qualified solar installer or engineer can help determine the most suitable fixtures for your specific roof structure and ensure compliance with Australian standards.

By using the appropriate roof fixtures and following installation best practices, you can enhance your solar PV system’s safety, performance, and longevity while maximising the benefits of clean, renewable energy.
Hope, you found this blog useful. Our electricians are trained to the highest standards at AUSINET. For all your installation needs contact ABI Electric.